How to Propagate Pothos in Water: Step-by-Step
If you have ever looked at your trailing pothos and thought, 'I wish I had more of these,' you are already halfway to becoming a propagation enthusiast. Pothos (Epipremnum aureum) is one of the most forgiving plants to propagate in water, making it a perfect starting point for beginners. The process is low-cost, genuinely satisfying, and gives you a front-row seat to watch roots develop in real time. Whether you want to fill a new pot, share cuttings with friends, or simply refresh a leggy plant, water propagation of pothos is a skill worth adding to your plant care toolkit.
Choosing the Right Propagation Method
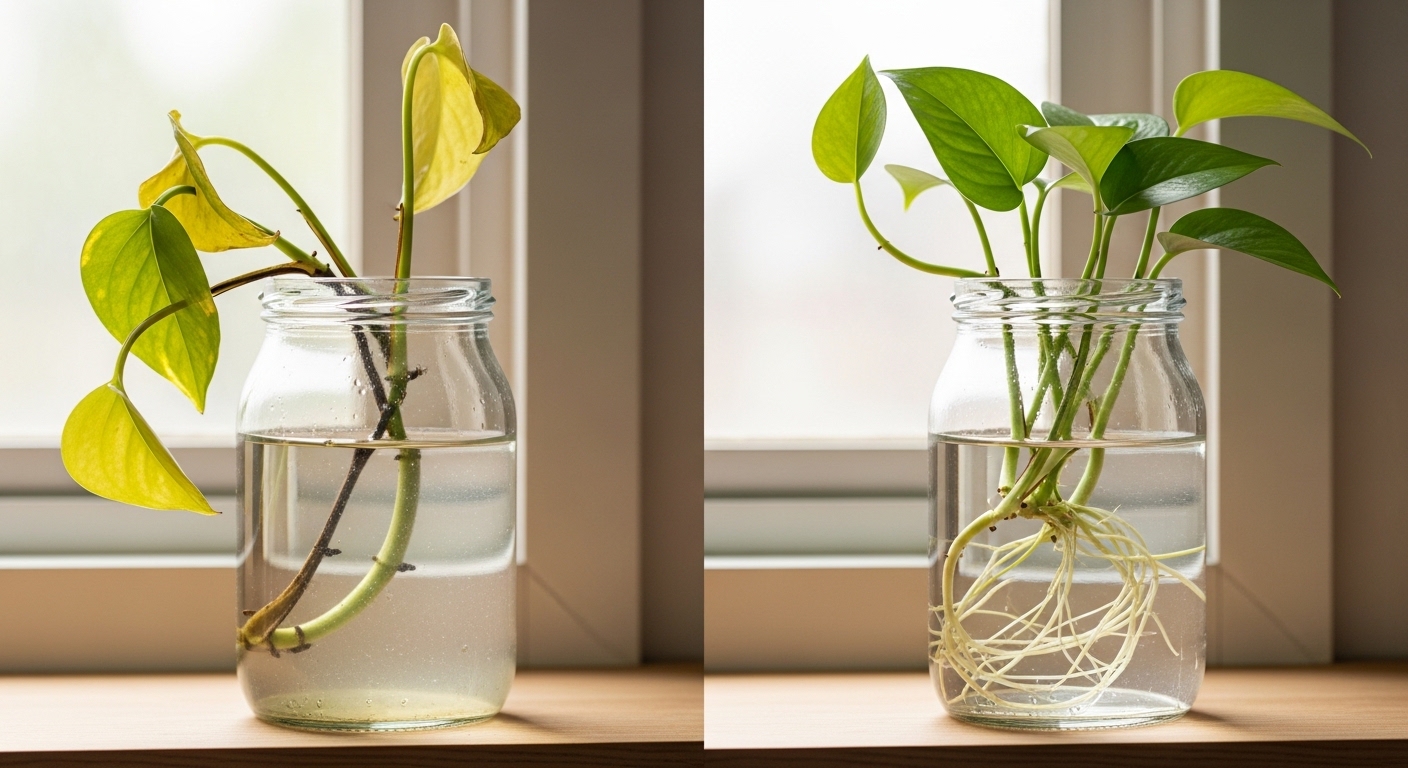
Pothos can be propagated in soil or water, but water propagation has a distinct advantage for beginners: you can actually see the roots forming. This visual feedback helps you know exactly when a cutting is ready to pot up, removing a lot of the guesswork. Water propagation also tends to produce roots relatively quickly under the right conditions, generally within two to four weeks.
That said, not every cutting will succeed, and choosing the right method starts with understanding what your plant needs. For pothos, water propagation works best when you take cuttings during the active growing season — typically spring through early summer — when the plant's energy is directed toward new growth. Cuttings taken in late autumn or winter may still root, but the process can be noticeably slower.
A healthy mother plant produces the strongest cuttings. Before you take a single snip, make sure your pothos has been well-watered and is growing in good light for at least a week or two beforehand.
Step-by-Step: Water Propagation
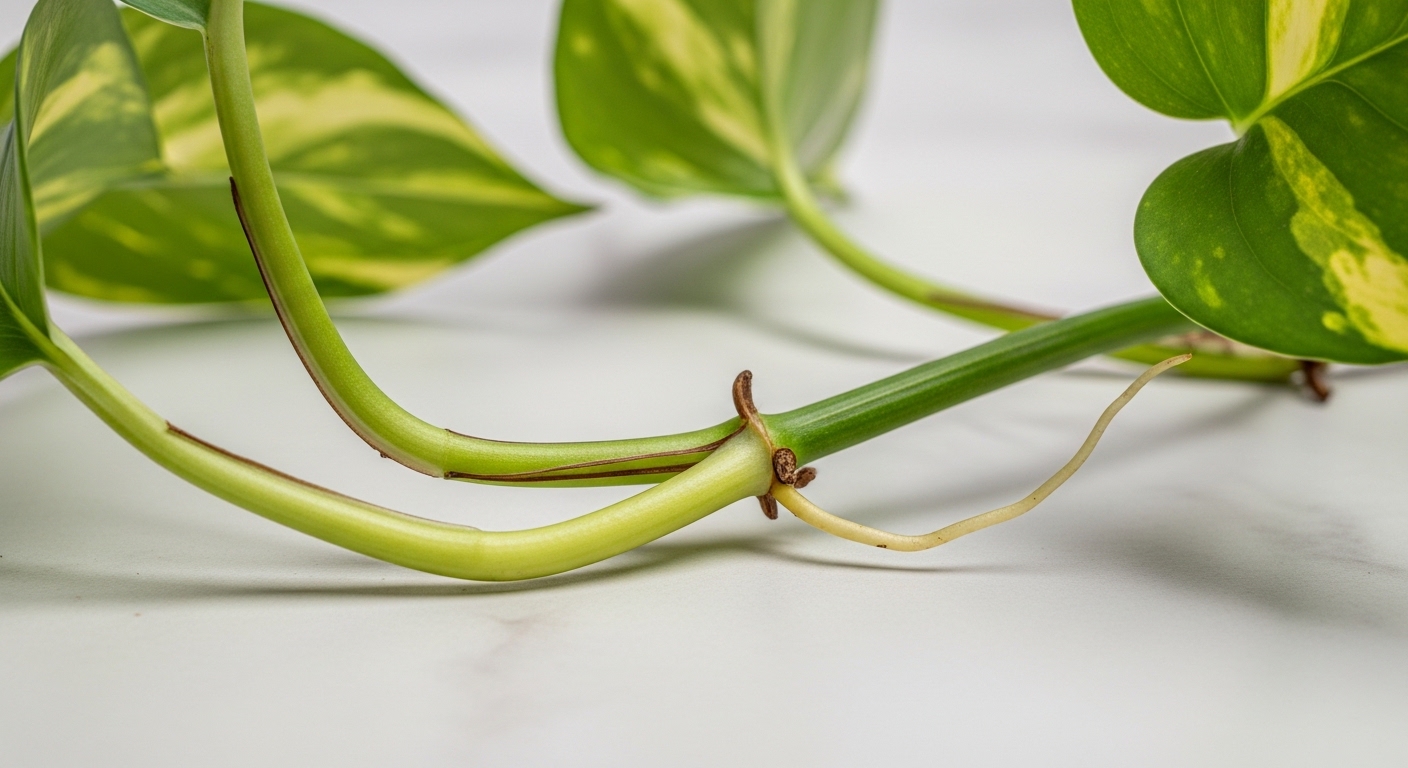
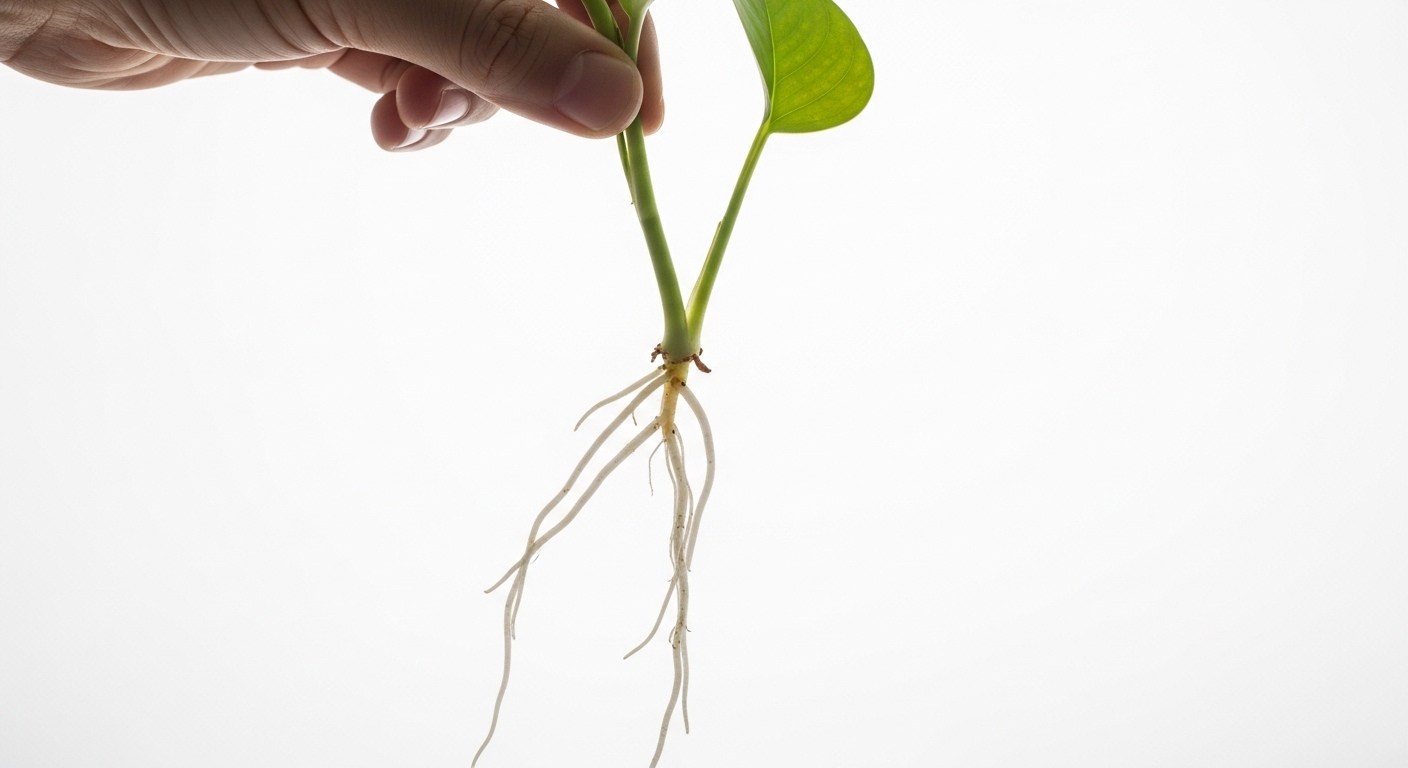
The most important thing to get right before you cut anything is identifying the node. A node is the small, brownish, slightly raised bump on the stem where a leaf meets the vine. Roots will only grow from a node — a cutting without one will simply rot in water. Look closely at your pothos stem and you will see these nodes at regular intervals along the vine.
Once you have identified a healthy section of stem, follow these steps:
- Select your cutting: Choose a stem with at least one node and one or two healthy leaves. A cutting around 10–15 cm long is ideal.
- Make a clean cut: Use clean, sharp scissors or pruning shears. Cut just below a node — about 0.5 cm beneath it — at a 45-degree angle to maximize the surface area exposed to water.
- Remove lower leaves: Strip off any leaves that would sit below the waterline. Submerged leaves will rot and can introduce bacteria into the water.
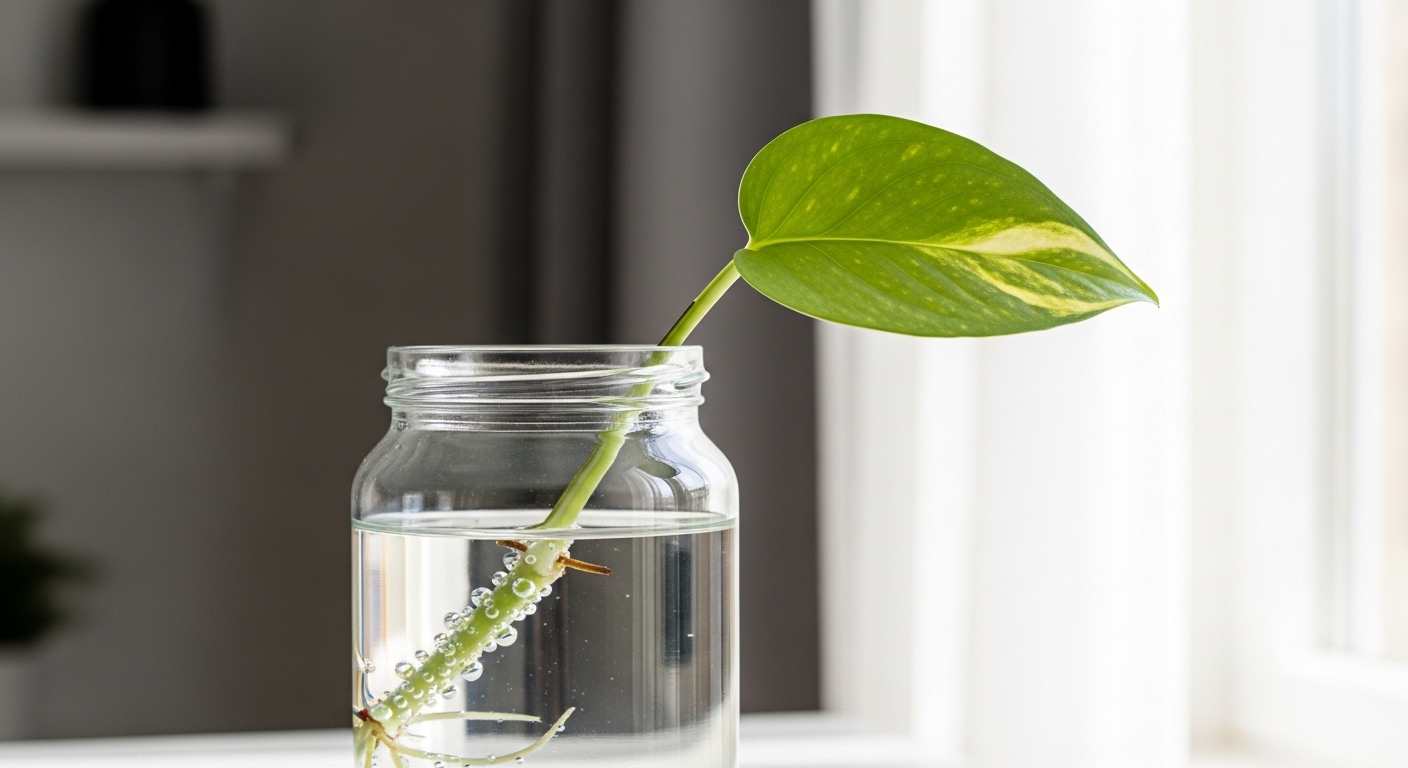
- Place in water: Set the cutting in a clean glass or jar filled with room-temperature water. The node must be fully submerged, but the remaining leaves should sit above the waterline.
- Position in bright indirect light: Place the jar near a window that receives bright, indirect light. Avoid direct sun, which can overheat the water and encourage algae growth.
- Change the water regularly: Refresh the water every five to seven days to keep it oxygenated and prevent bacterial buildup. Tap water that has been left to sit for 24 hours works well, as it allows chlorine to dissipate.
Step-by-Step: Soil Propagation
If you prefer to skip the water stage entirely, pothos cuttings can also be rooted directly in a well-draining propagation mix. Many growers find that soil-rooted cuttings adapt more easily when it comes time to pot them up permanently, since the roots develop in the medium they will continue to grow in. The trade-off is that you cannot see what is happening underground, so patience is key.
To propagate pothos directly in soil:
- Prepare your mix: Use a light, well-draining propagation medium — a blend of perlite and standard potting mix in roughly equal parts tends to work well for most growers.
- Take your cutting: Follow the same cutting technique as water propagation — clean cut just below a node, lower leaves removed.
- Optional rooting hormone: Dipping the cut end in powdered or gel rooting hormone can encourage faster root development, though pothos often roots readily without it.
- Insert the cutting: Make a small hole in the moist propagation mix with a pencil or chopstick, then gently insert the cutting so the node is buried about 2–3 cm below the surface.
- Maintain moisture: Keep the mix consistently moist but not waterlogged. Covering the pot loosely with a clear plastic bag can help retain humidity around the cutting.
- Check for roots: After three to four weeks, gently tug the cutting. Resistance indicates that roots have formed and anchored into the mix.
Rooting Timeline & What to Expect
In water, most pothos cuttings will show the first tiny white root nubs within one to two weeks, particularly in warm conditions (around 20–25°C is generally ideal). By week three or four, you may see a small network of roots several centimetres long. At this stage, the cutting is ready to transition to soil — though some growers choose to leave cuttings in water indefinitely, which pothos can tolerate reasonably well.
Here is a general timeline to set your expectations:
- Days 1–7: The cut end begins to callus slightly. No visible roots yet — this is normal.
- Days 7–14: Small white root nubs appear at or near the node.
- Days 14–28: Roots extend to 2–5 cm. The cutting may show a small new leaf unfurling.
- Week 4–6: A healthy root system has developed. The cutting is ready to pot up.
Slower rooting can happen in cooler rooms, low-light conditions, or if the node was not fully submerged. If you notice the stem turning mushy or dark, remove that cutting, clean the jar, and try again with a fresh snip.
Common Propagation Mistakes
Even with a plant as easygoing as pothos, a few missteps can slow down or derail the rooting process. Knowing what to watch for makes all the difference.
- Cutting without a node: This is the most common reason cuttings fail entirely. Always confirm there is at least one node on your cutting before placing it in water.
- Leaving leaves submerged: Any leaf material below the waterline will decompose, clouding the water and creating conditions where bacteria can harm the developing roots.
- Infrequent water changes: Stagnant water becomes depleted of oxygen and can harbour harmful microbes. Refreshing the water every five to seven days keeps the environment clean and supportive.
- Too much direct sun: Direct sunlight warms the water rapidly, promotes algae growth, and can stress the cutting before it has had a chance to root.
- Potting up too early: Roots shorter than 2–3 cm may struggle to establish in soil. Waiting until the root system is more developed gives your new plant a much stronger start.
- Using a dirty container: Always start with a clean jar. Residue from previous use can introduce pathogens that inhibit rooting.
Potting Up Your New Plant
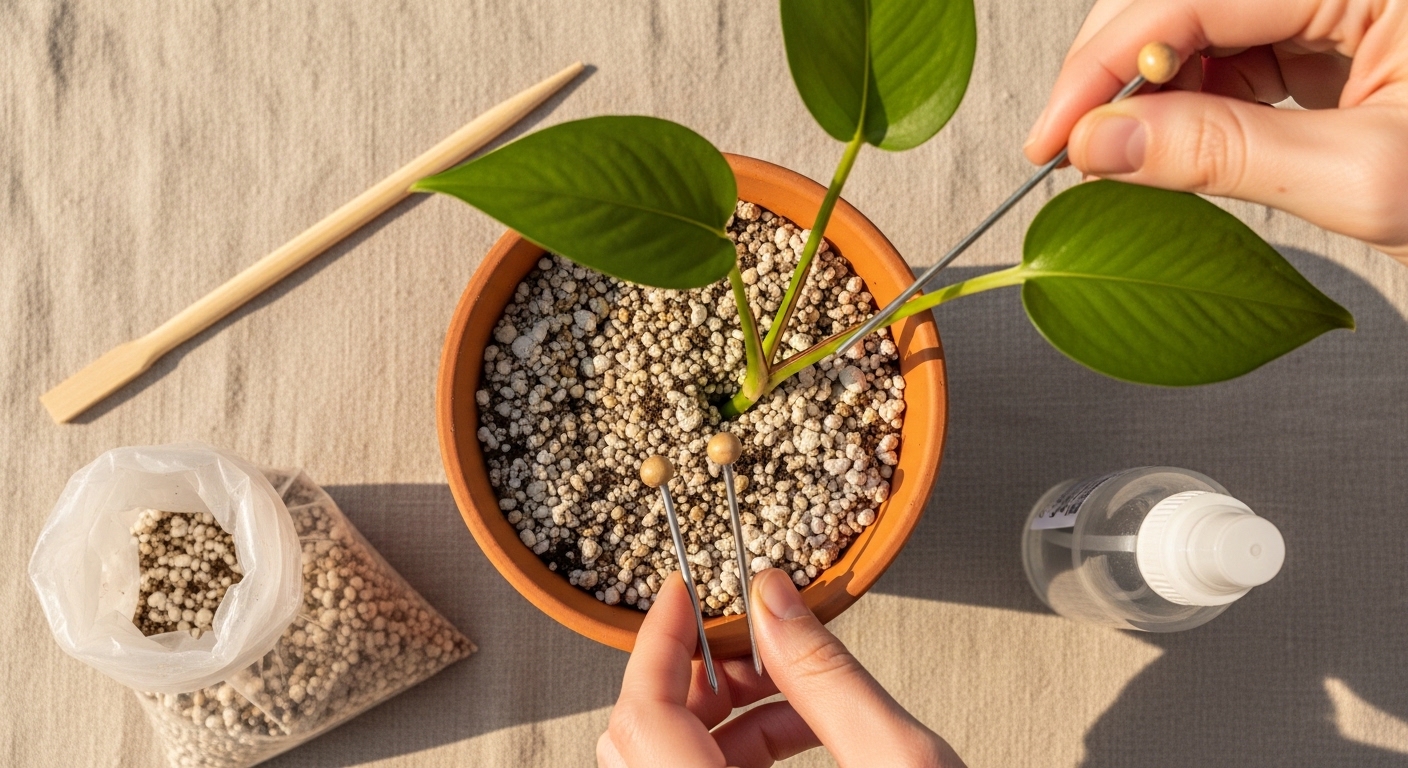
Once your water-rooted cutting has a healthy root system — generally 3–5 cm of white, firm roots — it is time to transition it to soil. This step requires a little care, because roots that developed in water are adapted to an aquatic environment and can experience mild shock when moved to a drier medium.
Follow these steps for a smooth transition:
- Choose the right pot: Select a small pot with drainage holes — only slightly larger than the root ball. A 7–10 cm pot is usually appropriate for a single cutting.
- Use a well-draining mix: A standard indoor potting mix with added perlite (roughly 3 parts mix to 1 part perlite) provides good drainage while retaining enough moisture for the transitioning roots.
- Plant gently: Make a hole in the moist soil, lower the cutting in, and firm the mix gently around the roots without compressing it too tightly.
- Water thoroughly: Give the newly potted cutting a good drink to settle the soil around the roots and reduce air pockets.
- Keep the soil consistently moist for the first two weeks: Water-adapted roots need a slightly more humid soil environment while they adjust. Check the top 2 cm of soil — water when it begins to feel dry to the touch.
- Avoid fertilising immediately: Hold off on any fertiliser for four to six weeks. The young root system is delicate, and feeding too early can cause root burn.
Within a few weeks, you should notice new leaf growth — a reliable sign that your cutting has successfully established itself in its new home.

Propagating pothos in water is one of those plant care rituals that never gets old. Each cutting is a small act of patience and curiosity — and the reward is a brand-new plant that you grew yourself from a single stem. Once you have mastered the basics, you will find yourself eyeing every trailing vine as a future cutting. Share them, gift them, or fill every corner of your home with lush green growth. Your pothos will thank you for the trim, and your windowsills will never look bare again.


Comments
Post a Comment