Succulent Leaf Propagation: Step-by-Step Guide
There is something quietly magical about watching a single plump leaf transform into a brand-new rosette. Succulent leaf propagation is one of the most rewarding skills a plant parent can develop — and it costs almost nothing to try. If you have ever snapped a leaf off a echeveria or sedum by accident, you already have everything you need to get started. This guide walks you through every stage of succulent leaf propagation, from choosing the right leaf to potting up your first tiny plant.
Choosing the Right Propagation Method
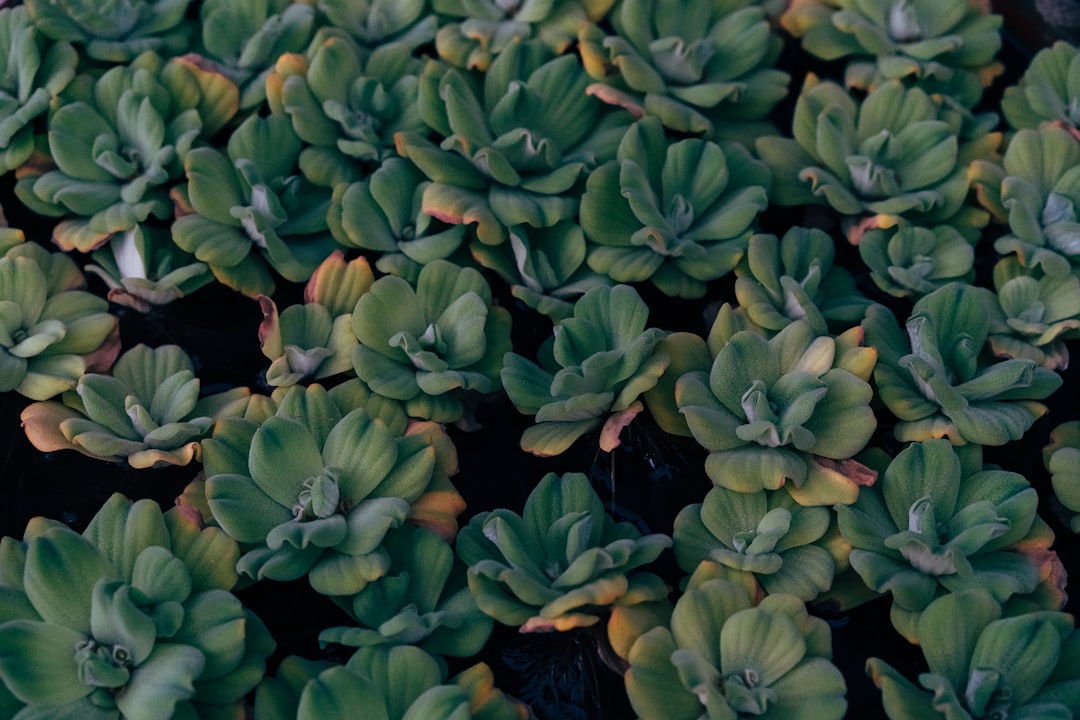
Not every succulent propagates well from leaves. Understanding which method suits your plant is the first step toward consistent success. Rosette-forming succulents — think echeveria, graptoveria, sedum, and pachyveria — are the best candidates for leaf propagation. Succulents with fibrous or woody stems, such as aloe, haworthia, and aeonium, generally do not propagate reliably from individual leaves and respond better to offsets or stem cuttings.
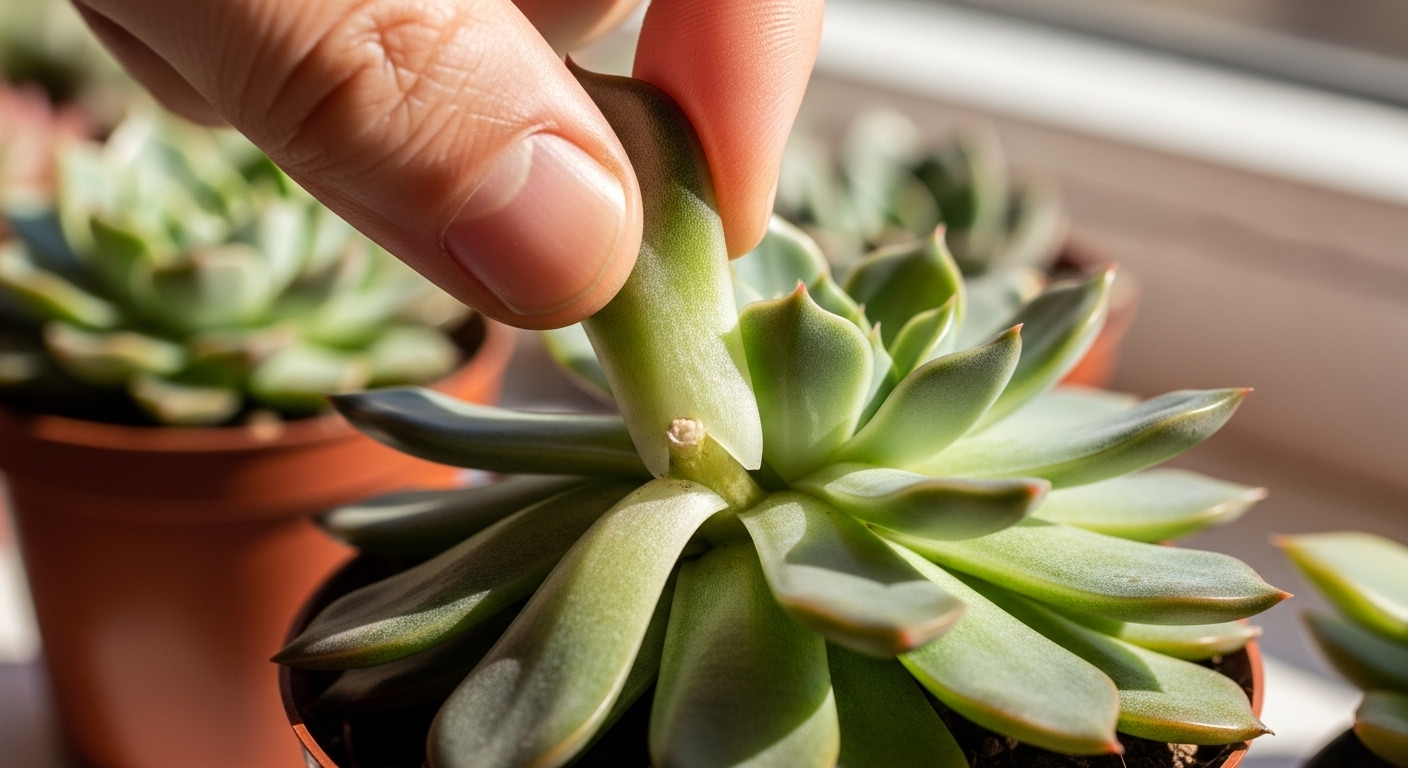
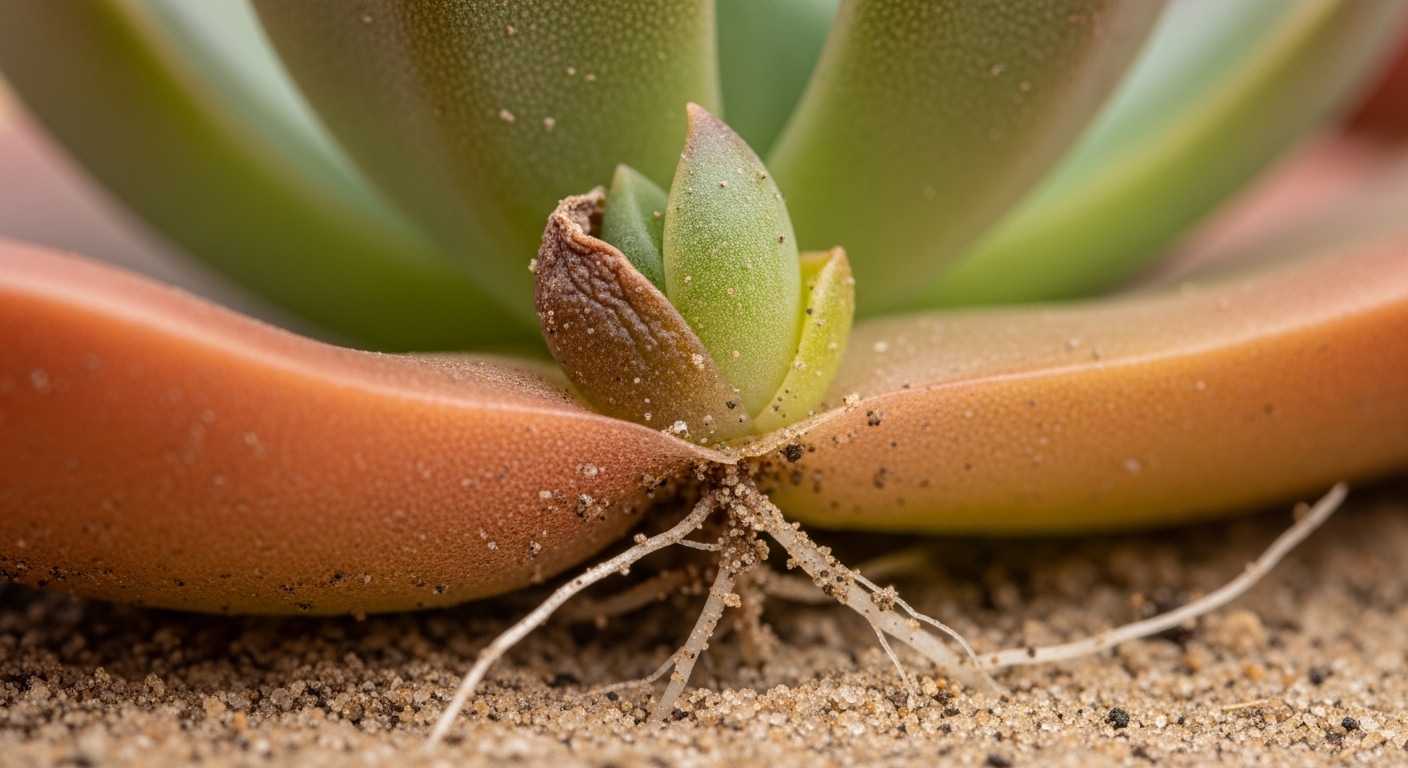
For leaf propagation to work, the leaf must be removed with its base, or basal meristem, completely intact. This is the small growth point at the very bottom of the leaf where it attaches to the stem. Without it, the leaf has no cellular material from which roots and a new rosette can develop. A clean, gentle twist-and-pull motion — rather than cutting — tends to preserve this base most reliably.
A leaf with a clean, complete base is the single most important factor in successful succulent propagation. Even the best conditions cannot compensate for a leaf with a torn or missing meristem.
When selecting leaves, look for these qualities:
- Firm and plump, not shriveled or translucent
- Free from pest damage, discoloration, or soft spots
- Taken from the lower, mature section of the rosette — not the newest growth at the center
- Removed with the full base intact, leaving a clean scar on the mother plant
Step-by-Step: The Callusing Stage
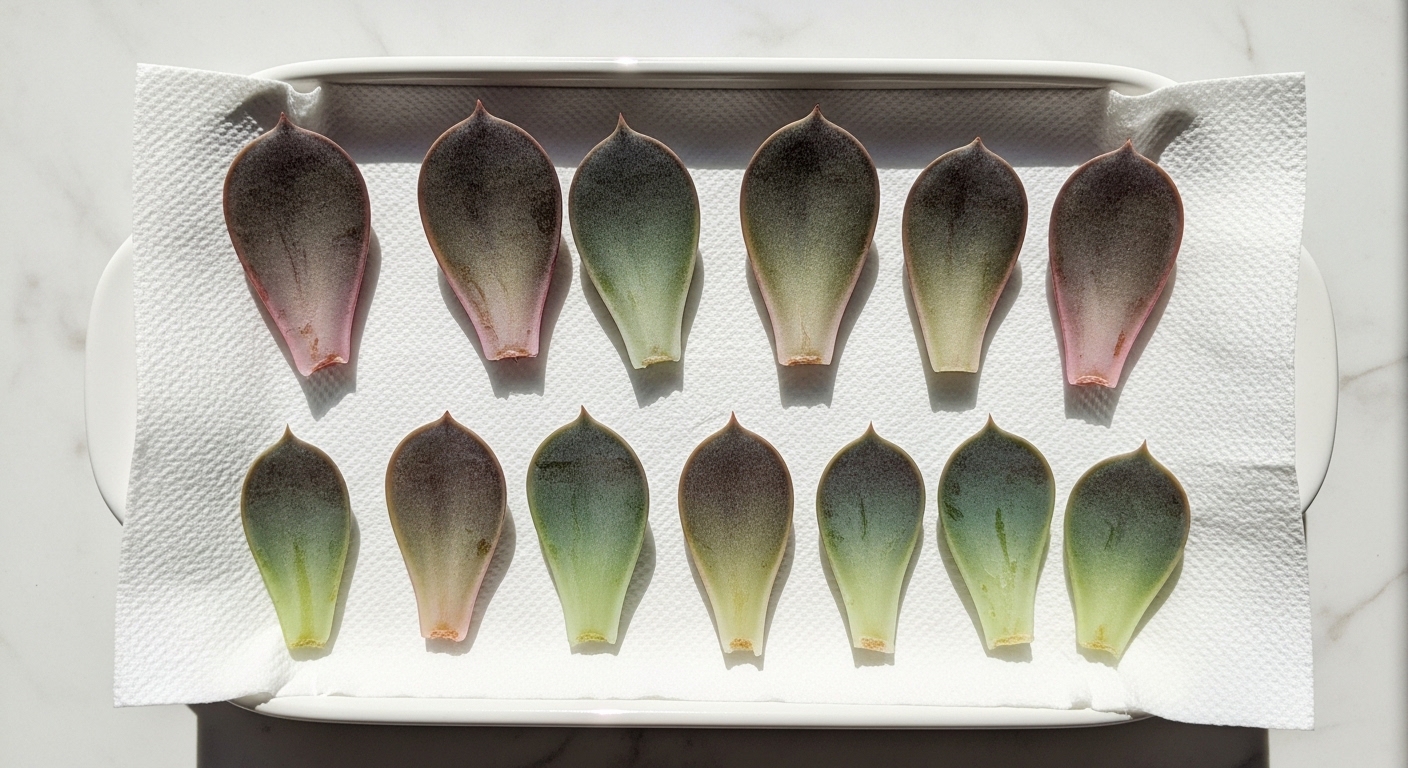
Once you have your leaves, resist the urge to place them straight onto soil. The freshly exposed base needs time to callus — a thin, dry seal that forms over the wound and prevents rot when the leaf eventually contacts moisture. Skipping this stage is one of the most common reasons propagation attempts fail.
Lay your leaves on a dry surface — a paper towel, a mesh tray, or a shallow ceramic dish works well. Keep them in a warm spot with bright indirect light and good airflow. Avoid direct sun at this stage, as intense heat can dehydrate the leaf before it has a chance to develop roots.
The callusing process generally takes between two and five days, depending on ambient temperature and humidity. You will know a leaf is ready when the cut end appears dry, slightly papery, and no longer looks freshly moist. In higher humidity environments, allow a day or two extra to be safe.
During callusing, you may notice the leaf beginning to wrinkle very slightly. This is normal — the leaf is drawing on its own stored water. As long as it remains firm rather than completely limp, it is still viable.
Step-by-Step: Placing Leaves on Soil
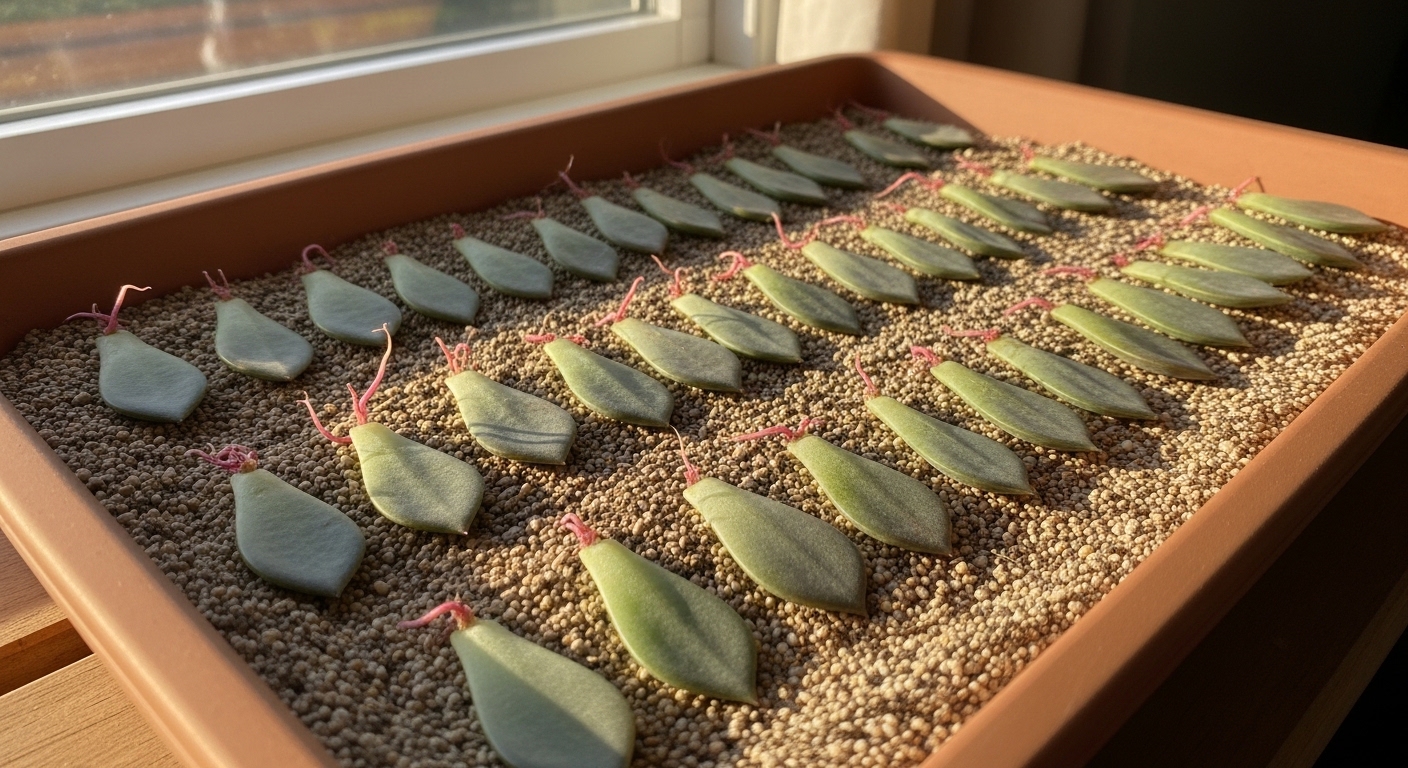
Once callused, your leaves are ready to meet their growing medium. Use a well-draining propagation mix — a blend of coarse perlite and cactus potting soil in roughly equal parts tends to work well for most growers. Avoid heavy, moisture-retentive mixes, which can cause the developing roots to rot before they establish.
Lay the leaves horizontally on top of the dry soil surface. Do not bury them or press the base into the soil at this stage. The emerging roots need to find their own way down, and covering the leaf can trap moisture and encourage fungal issues. A shallow tray or wide, flat container is ideal — it allows you to arrange many leaves at once without crowding.
Place the tray in a spot with bright indirect light and temperatures between roughly 18–27°C (65–80°F). A south- or east-facing windowsill is often ideal. Avoid placing leaves in full direct sun, which can scorch them before roots develop.
For the first week or two, keep the soil completely dry. Once you notice the first tiny pink or white roots emerging from the base of a leaf, you can begin misting the soil lightly every two to three days. The goal is to keep the top layer of soil barely moist — not wet. Use a spray bottle rather than pouring water directly, which can dislodge the delicate new roots.
- Use a 50/50 mix of cactus soil and coarse perlite
- Lay leaves flat on the surface — do not bury them
- Begin misting only after roots appear
- Maintain bright indirect light and warmth
- Avoid overwatering at every stage — succulents store water in their leaves
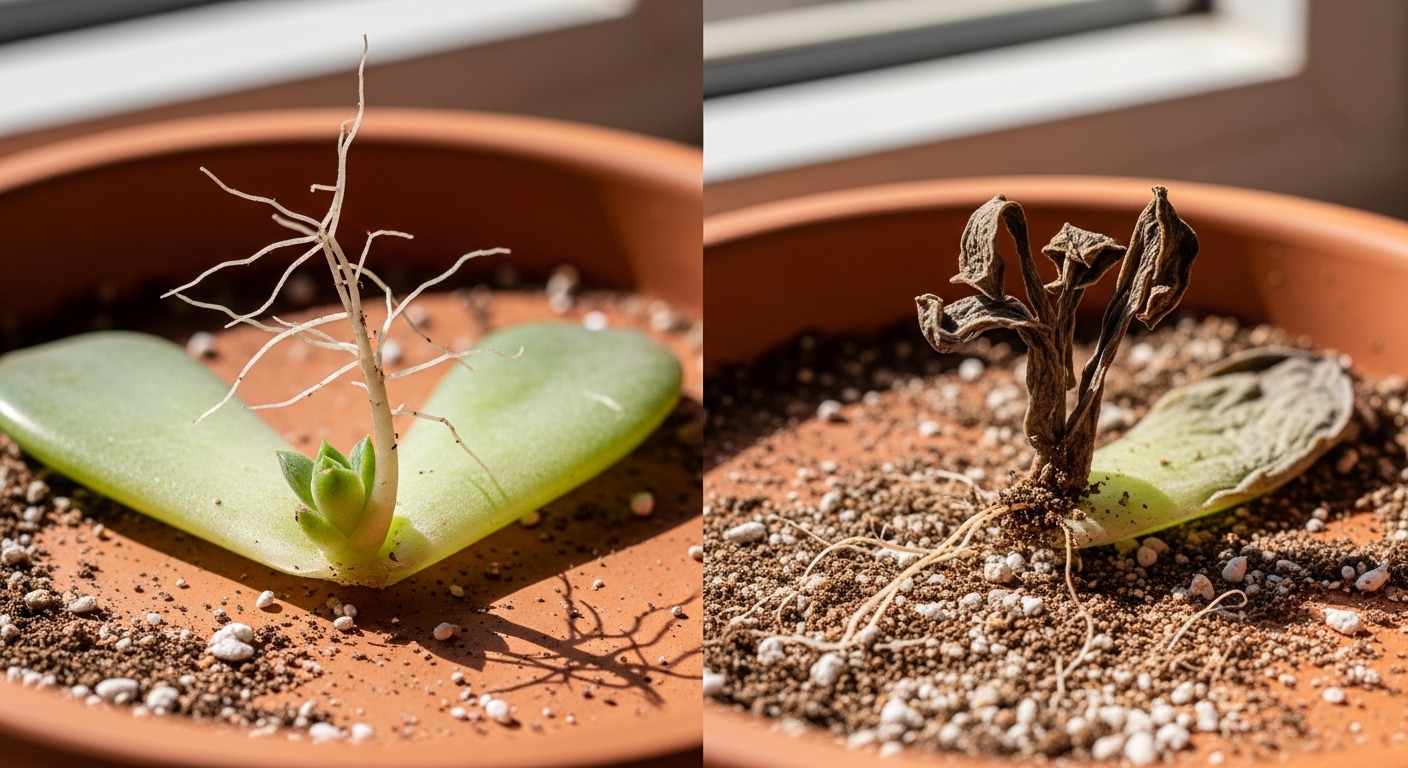
Rooting Timeline and What to Expect
Patience is the most underrated tool in propagation. Under good conditions, most succulent leaves will show their first roots within one to three weeks. The timeline varies by species, season, and environment — leaves propagated in warm, bright conditions during spring and summer tend to develop faster than those started in a cool, dim winter room.
After roots appear, a tiny rosette — often called a 'pup' — will begin to emerge from the same base point, usually within two to six weeks. It starts as a cluster of miniature leaves no bigger than a pea, gradually unfurling into a recognizable rosette shape. The color and form will often mirror the mother plant, though slight variation is common.
As the new rosette grows, the original leaf will slowly shrivel and dry out. This is completely normal and expected — the mother leaf is transferring its stored nutrients and water into the developing plant. Do not remove the original leaf until it has fully dried and detaches on its own. Pulling it away early can disturb the fragile root system.
Here is a general timeline many growers observe:
- Days 1–5: Callusing period — leaf rests on dry surface
- Week 1–3: First roots emerge from the base
- Week 2–6: Tiny rosette pup appears and begins to unfurl
- Week 6–12: Rosette grows steadily; original leaf shrivels
- Week 10–16: Plant is large enough to pot up individually
Common Propagation Mistakes
Even with the right setup, a few common missteps can slow or stall your propagation. Knowing what to watch for makes it much easier to course-correct early.
- Watering too soon or too heavily: Moisture before roots appear is the leading cause of rot. Wait until you can see roots before introducing any water.
- Using dense, moisture-retentive soil: Standard potting mix holds far too much water for succulent propagation. Always use a fast-draining mix.
- Removing the mother leaf too early: The original leaf feeds the developing rosette. Let it shrivel and fall away naturally.
- Placing leaves in direct harsh sun: Intense direct sun can dehydrate leaves before roots develop. Bright indirect light is the sweet spot.
- Expecting every leaf to succeed: A success rate of 50–70% is considered normal by many experienced growers. Propagate more leaves than you need.
- Using leaves from the center of the rosette: Young inner leaves are less mature and tend to have a lower success rate than outer, established leaves.
Leaf turns mushy and brown at the base → Likely rot from excess moisture or a damaged meristem. Remove it from the tray to prevent spread, and allow remaining leaves more airflow.
Leaf shrivels completely with no roots after 4+ weeks → May indicate too much heat, too little humidity, or a leaf taken without its base. Discard and start fresh with new leaves.
Roots appear but no rosette develops → Give it more time — rosette development can lag behind rooting by several weeks. Ensure the leaf is receiving adequate indirect light.
Potting Up Your New Plant
Once your rosette has grown to roughly 2–3 cm in diameter and has a visible root system, it is ready to be potted up into its own container. This is one of the most satisfying moments in the entire propagation journey — your single leaf has become a real, independent plant.
Choose a small pot with a drainage hole — a 5–7 cm terracotta pot is ideal for a young succulent. Fill it with the same well-draining cactus mix you used for propagation. Gently lift the rosette from the propagation tray, taking care not to tear the roots. If the original mother leaf is still attached but fully dried, it will usually detach with a gentle touch at this stage.
Plant the rosette so its roots are covered and the base of the rosette sits just at or slightly above soil level. Water lightly once to help the roots settle, then allow the soil to dry completely before watering again. From this point, care for your new succulent as you would any established plant — bright light, infrequent deep watering, and a well-draining mix.
For the first two to four weeks after potting up, keep the plant in bright indirect light rather than direct sun while it adjusts to its new container. Gradually introduce more light over time to encourage compact, healthy growth and vibrant color.
- Use a small terracotta pot with a drainage hole
- Well-draining cactus mix with added perlite
- Plant rosette at or just above soil level
- Water once lightly at potting, then allow to dry fully
- Transition gradually to brighter light over two to four weeks

Every rosette you grow from a single leaf is a small act of patience rewarded. Once you understand the rhythm of callusing, rooting, and rosette development, the process becomes almost meditative — and your collection can grow without spending a cent.


Comments
Post a Comment